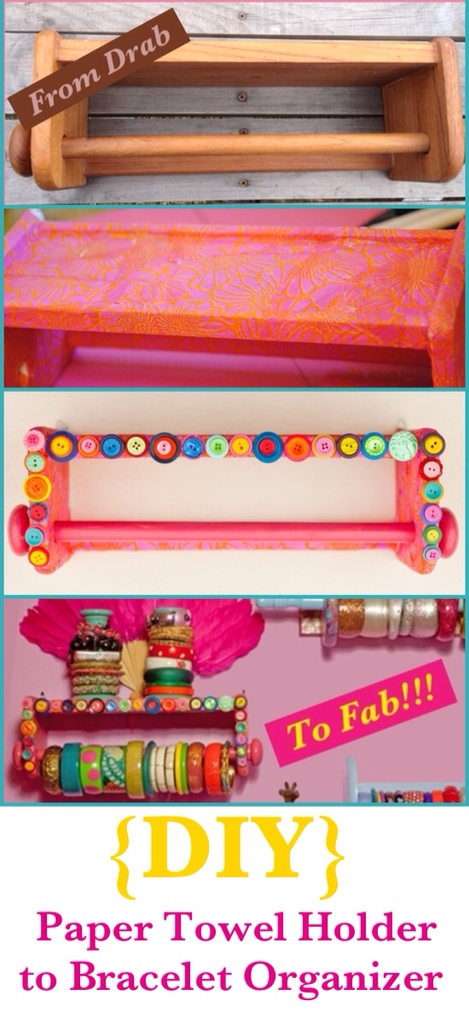
Bracelets, Bangles, and Cuffs, we all have them, some more than others and there comes a time when you have so many that organizing your bracelet collection is in order!!! Today I’m going to do a Super Easy DIY Bracelet Organizer from a Vintage Paper Towel Holder.
What is great about these vintage paper towel holders is that they come in many different styles, most hang on the wall, and you can choose to decorate them anyway you choose to reflect your style and decor. They are everywhere, I literally bump into these things left and right, they are also easily available on eBay too!!!
I did three different versions below, depending on how much time you have or how into it you want to get is up to you. For today I’ll be doing “The Works” DIY Bracelet Organizer. Yes it is very self explanatory but tutorials can never hurt!!! So let’s get to it!

Materials Needed
Vintage Paper Towel Holder
Spray Paint
Mod Podge
Foam Brush
Paper Bowl
Paper for Mod Podge-ing
Embellishments, in this case Buttons
Glue, I use E-6000, but Elmer’s works just as well
Directions
1. Clean off your vintage paper towel holder with a damp paper towel, just to get the dust off. Let it dry for 1 minute
2. Get your spray paint ready, I use Rustoleum Painter’s Touch, because it dries super quickly and bonds to anything and everything. Spray paint your paper towel holder. If you will be doing Mod Podge over it then one coat will be more than enough. If you are just spray painting it, then do two coats. If you want to seal it go for it but it will not be going to battle so I skip the sealer.
3. Once your paper towel holder is dry, time for Mod Podge, pour it into a paper bowl, dip your foam brush and start Mod Podge-ing with your paper. I am in LOVE with Decopatch paper, it is a French brand and only one place carries it in the United States. I buy it online at Ornamentea…..this place is awesome!!! Decopatch is a dream to work with, you just rip it and put it on anything. It’s so pretty!!! I love Decopatch!!!
4. Let everything dry, you can give your paper another coat of Mod Podge as a topcoat, then let dry again.
5. Get out your buttons and glue away. I like to stack my buttons so it gives envy thing more depth. Let dry.
6. Hang your fabulous Bracelet Organizer on the wall, throw your bracelets on there and THE END! From Drab to Fab!!

It is super easy and now you are that much more organized!!! Feel free to ask any questions. I’ll be doing a whole post next Wednesday on some other easy DIY ideas for organizing those bracelets so check back:)
Xo
a.